By Neil Shorney.
Here are two useful functions plus a light-hearted one which my wife discovered...
The first is great for anyone dealing with manually-entered data which might be a little untidy... The TRIM function will remove any preceding or training spaces. You could create a new column after a column of data (for example, names or addresses) and enter the following formula: =TRIM(cell ref). For example if A1 contains " Hello ", and you enter =TRIM(A1), the result will be "Hello". This is an important little step towards cleaner data.
You're probably familiar with using MAX and MIN to display the largest and smallest values in a list. But what if you want the third smallest? We can use SMALL to do this. Imagine D1:D5 contains 8, 5, 6, 1, 3 and you want to know the third smallest number. Use =SMALL(D1:D5,3) to show this.
Why not have a play with LARGE? It works in exactly the same way.
And a fun one to close: try entering =ROMAN(2018) into Excel and see what you get...
Monday, 27 November 2017
Friday, 29 September 2017
Adding comments within formulas using the “N” function
By Neil Shorney
As you’re getting more advanced with Excel, you’re probably finding that you’re not quite sure what a formula does if you look back at it after a few days or weeks.
Did you know that you can add a description within your formula and not affect the result? The “N” function turns non-numbers into numbers (dates to serial numbers, for example) and anything else to zero (i.e. text). So you can add a comment by using the “N” function to replace your text with zero without affecting the formula itself. Confused? Try this and see what happens:
=7*4+N("Number of days in 4 weeks")
You should see that everything within the “N” brackets is ignored, therefore allowing you to add your own notes to formulas and better remember what they do!
Neil Shorney is director of Navanter, which owns the Naturally Spreadsheets brand - Excel training in person or via live e-learning to professionals around the world.
Tuesday, 15 August 2017
Highlighting trailing spaces with Data Validation
In part 2 of our trilogy about trailing spaces (part 1 is just here) we look at how to identify trailing spaces if you have them in your data sets. As discussed in part 1, they're hard to spot, as we can't see spaces with the naked eye at the end of a cell. In this post, we'll look at how to identify them using Conditional Formatting.
First, I have some "raw" data, which contains some trailing spaces which I can't currently see:

Now, click on Conditional Formatting on the Home tab:


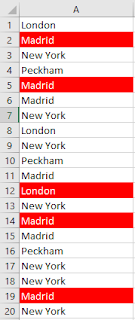
Then click the Format button and format these highlighted cells as you like. For me, the finished data then looks like this:
If you'd like to have a go at this yourself, you can download an Excel file with the completed example, and a raw data set for you to try yourself. Click here to download the file.
First, I have some "raw" data, which contains some trailing spaces which I can't currently see:

Now, click on Conditional Formatting on the Home tab:
In the drop-down, choose Highlight Cells Rules then More Rules:

Then, in the Conditional Formatting dialogue, choose the second option:
Format only cells that contain then specific text, ending with and then
insert a space in the text box:


If you'd like to have a go at this yourself, you can download an Excel file with the completed example, and a raw data set for you to try yourself. Click here to download the file.
Tuesday, 18 July 2017
Preserving cell formatting when filling down
In this blog post, we're going to
take a look at
Excel's Fill
Down
function, and
what that
means for
formatting.
The Fill Down function is one of the greatest time-savers in Excel. Create a formula with relative references, drag the formula down and watch your data complete itself automatically! It's a great tool, until formatting gets in the way and spoils the fun.
For those unfamiliar with the tool, the idea is that you select the cell with the formula to copy, click on the little black square in the bottom-right corner, and drag it down to create further formulas automatically. You can try it in the attached example.
A frustrating problem is that doing this also copies formatting, so a nicely-formatted table as in the attached loses its colours and you need to spend time re-formatting.
The solution is to use the right mouse button instead of the left. As you let go after dragging, you'll be presented with a number of options. The one you'll need is "fill without formatting" - the formula or data will be copied as before, but formatting will remain in place.
We have an online video and downloadable example file to demonstrate this e-tip - watch the video just here.
Wednesday, 21 June 2017
Using Data Validation to prevent users entering trailing spaces
A question came up from an attendee on a recent Working With Data In Excel live e-learning course, which is a common request. Today's blog post will explain how to prevent users from inserting preceding or trailing spaces into a cell.
Why is this a problem
Imagine you have a column of data, containing the values "Red", "Green" and "Blue", which a user has entered manually. Except the user has entered some extra spaces after some of the values so that your column of data (column A) looks like this:
Red
Green
Green
Blue
Green[space]
Blue
Red[space]
Red
Green
I then create a formula to count the number of cells containing the value "Green", like so:
=COUNTIF(A:A,"Green")
How many will there be? It will tell me there are 2. Why? Because "Green[space]" is not the same as "Green" in Excel.
So as you can see, it becomes important to prevent users adding extra spaces after their data.
How do we stop them?
We can prevent leading or trailing spaces using Custom Data Validation. Here are the steps to work through...
A caution...
Unfortunately, Data Validation in Excel doesn't prevent people pasting incorrect values into the cell - only typing manually. There are 2 work-arounds for this, which we'll look at in future blog posts:
Get our Excel tips direct to your inbox and make sure you never miss a top tip - fill in your details just here.
Why is this a problem
Imagine you have a column of data, containing the values "Red", "Green" and "Blue", which a user has entered manually. Except the user has entered some extra spaces after some of the values so that your column of data (column A) looks like this:
Red
Green
Green
Blue
Green[space]
Blue
Red[space]
Red
Green
I then create a formula to count the number of cells containing the value "Green", like so:
=COUNTIF(A:A,"Green")
How many will there be? It will tell me there are 2. Why? Because "Green[space]" is not the same as "Green" in Excel.
So as you can see, it becomes important to prevent users adding extra spaces after their data.
How do we stop them?
We can prevent leading or trailing spaces using Custom Data Validation. Here are the steps to work through...
- Select the column you want to protect.
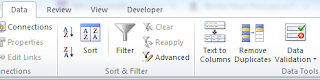
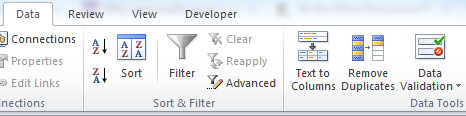
- Click on "Data Validation" on the Data tab.
- In the dialogue that pops up, choose "Custom".

- Enter the following formula into the box, replacing the references to "A1" with the first cell in your range: =TRIM(A1)=A1

A caution...
Unfortunately, Data Validation in Excel doesn't prevent people pasting incorrect values into the cell - only typing manually. There are 2 work-arounds for this, which we'll look at in future blog posts:
- Prevent people pasting anything into the sheet using a Macro, or
- Set up Conditional Formatting to show if cells have trailing spaces which have been pasted in.
Get our Excel tips direct to your inbox and make sure you never miss a top tip - fill in your details just here.
Subscribe to:
Posts (Atom)